How to get random records in a SQL

For this tutorial, we use SQL Server Express with SQL Server Management Studio, and the Wide World Importers test database.

The most common thing when we make a query in a database is that we want to obtain all the records that meet a certain condition.

For example, in the WideWorldImporters database, to get all the people who are allowed to LogOn, with results in alphabetical order by email address, the query would be this:

SELECT Application.People.FullName, Application.People.LogonName FROM Application.People WHERE (Application.People.IsPermittedToLogon = 1) ORDER BY Application.People.EmailAddress ASC

And the result is what you see in this screenshot:
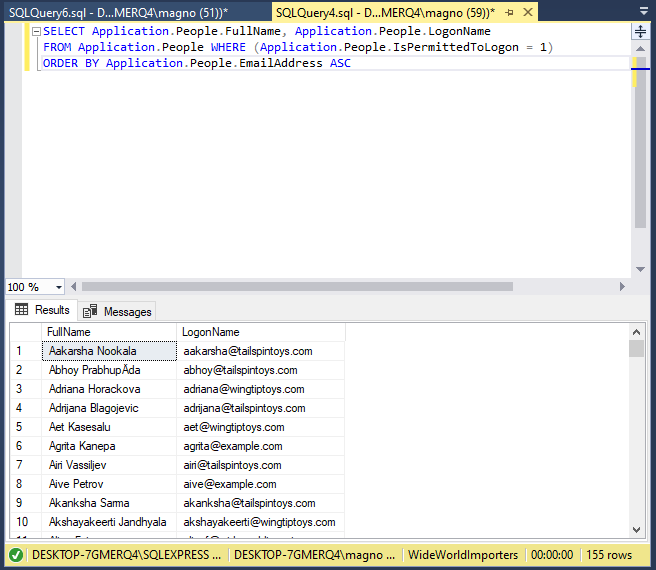
As you can see, it returns 155 results (shown on the bottom right) and gives you exactly what you needed. This is the most common.

If you want to get only the first 10 names, ordered alphabetically, just use the TOP keyword in front of the query indicating the number of records we need.

The query would be like this:

SELECT TOP(10) Application.People.FullName, Application.People.LogonName FROM Application.People WHERE (Application.People.IsPermittedToLogon = 1) ORDER BY Application.People.EmailAddress ASC
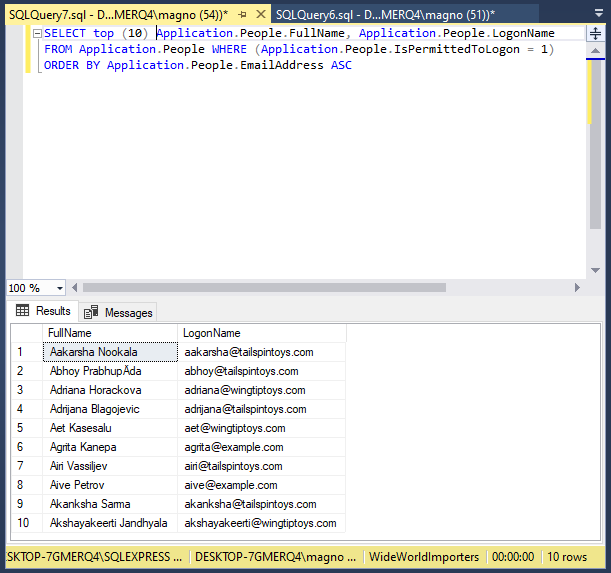
So far, you are somehow forcing SQL to give very specific records, however,  what about if what you need is for it to return a series of random records?

That is, instead of ordering them by a criterion and returning 10 chosen at random from all the results.

This can be useful for many things: to send notifications to 10 random people in a database or to choose 10 random emails in a survey, for example.

To achieve this in SQL Server you have several options, but the most common and simplest is to use the NEWID function.

Random registrations using NEWID

SQL Server has a function called NEWID that generates a new unique identifier of the GUID type (uniqueidentifier), generally to insert it as a field value and be able to uniquely identify a record.

The usual appearance of one of these IDs is as follows:

537CC0BA-95B6-4E35-BD3A-468BAB878D96

That is, strings with very long letters, numbers and hyphens that are random and that are guaranteed to be unique, hence its name: GUID, which stands for Globally Unique Identifier.

They are based on the combination of a pseudo-random number generated on the local computer together with the MAC of the first network card on it (which also has a unique identifier a priori).

You can include this NEWID function in the ordering clause, like this (Look is highlighted in red):

SELECT TOP (10) Application.People.FullName, Application.People.LogonName FROM Application.People WHERE (Application.People.IsPermittedToLogon = 1) ORDER BY NEWID()

What this will cause is that, for each record, a new unique identifier will be generated in the style of the one that was shown before, and then it will be sorted using said identifier.

Being this completely random value, and having placed a TOP X to the query (where X is the number of records we need) what we will achieve in practice is to obtain the first X random records of the table or tables we are querying:
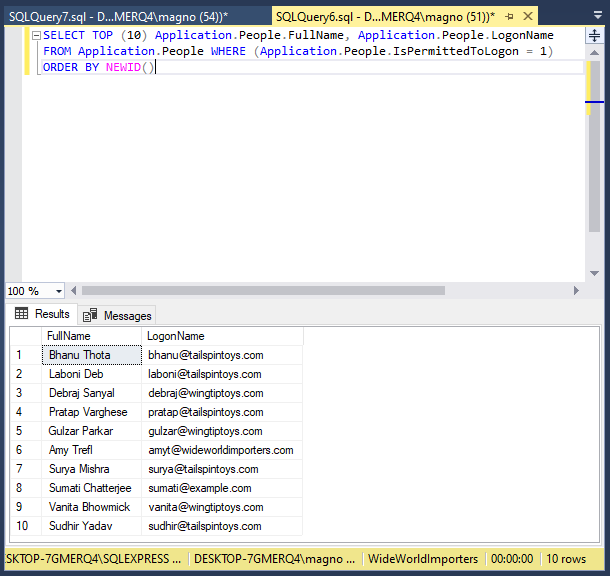
You can try it: each time you execute the query you will get a new set of records, chosen completely randomly.
Count Rows in in SQL

There are, in MySQL Server, functions that allow us to count records, calculate sums, averages, obtain maximum and minimum values, in short, perform common arithmetic operations, both with the number of records and with their values.

These functions operate on a set of values ​​(registers), and not on individual data, and return a single value.

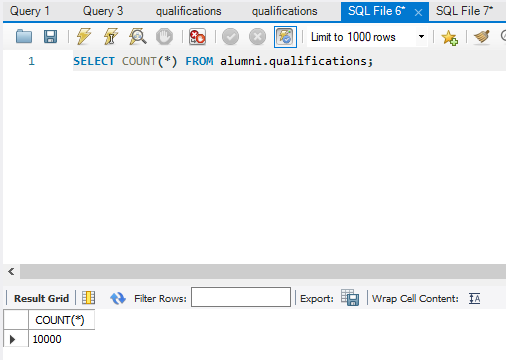
Let’s imagine that our “qualifications” table contains many records. To find out the amount without having to count them manually we use the COUNT() function.

SELECT COUNT(*) FROM alumni.qualifications;

The COUNT(*) function counts the number of records in a table, including those with a null value.

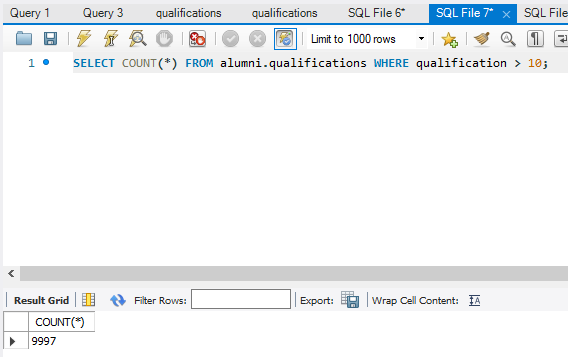
We can also use this function together with the WHERE clause for a more specific query, through filtering.

For example, you may want to know the number of users with a rating greater than 100:

SELECT COUNT(*) FROM alumni.qualifications WHERE qualification > 100;

To count the records that have a specific string (without taking into account those that have a null value), use the COUNT() function and in the parentheses we put the name of the field that we need to count:

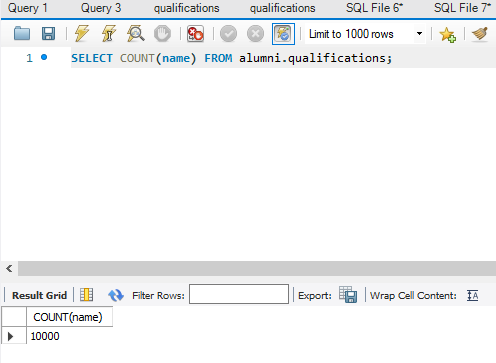
SELECT COUNT(name) FROM alumni.qualifications;

Note that COUNT(*) returns the number of records in a table (including those with a “null” value) while COUNT(name) returns the number of records in which the ‘name’ field is not null.

In other words, COUNT(*) counts records, if instead of an asterisk we put the name of a field as an argument, the records whose value in that field is NOT null are counted.

UNION Multiple Tables in SQL

We are going to learn how to query two or more tables to obtain requested results, which can have SELECTWHERE or HAVING conditions, and other operators.

To do this, the UNION statement will be used, instead of JOIN, to which there is a dedicated article.

This article is going to use Microsoft SQL Server and SSMS.

UNION

The UNION statement in SQL allows you to combine records from two or more tables in a database.

In special cases a table can join itself, producing a self-join, SELF UNION.

Mathematically, UNION is a relational composition, the fundamental operation in relational algebra, and, generalizing, it is a composition function.

In the standard SQL data query language, the UNION operator is used to combine the results of two independent queries, returning as a joint result all the records obtained by both.

Obviously, in order to perform the union, both queries must return exactly the same data types.

What is not necessary is that they are obtained in the same way.

That is, some could be direct fields obtained from a table query, and the second part could be calculated fields. As long as they have the same name and type there is no problem.

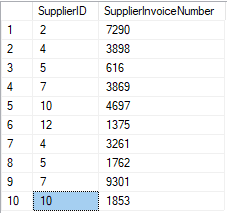
So in the simplest case, for example, if you have two information tables with data from Suppliers, Names and Invoice Number, something like this (in two different tables):

You can write a query like this:


SELECT TOP(10) SupplierID, SupplierName FROM wideworldimporters.Purchasing.Suppliers
Union
SELECT TOP(10) SupplierID, SupplierInvoiceNumber FROM wideworldimporters.Purchasing.SupplierTransactions

Where you will obtain, if it exists, the invoice number, for each client obtained separately in the first query, if the invoice does not exist, then this data will not be obtained.

An important thing to consider is that UNION prevents duplicate records from being in the final result. That is, it removes duplicate rows where all field values ​​are the same.

However, if  you want to get all the data, including the duplicate rows, use UNION ALL.

Finally, UNION ALL offers much better resource performance than UNION.

The reason is that by not having to discriminate between repeated records, the process is much simpler.

In regular queries with few records you will not notice it, but in large queries with many possible results you will.

In any case, if you are sure that the two result sets that you are going to join do not have common data (or you do not care), it is better to always use UNION ALL for this reason.

Delete all rows from a table in SQL

The task of deleting the entire contents of a very large table or in a very old database is usually a bit cumbersome.

If it is a table with thousands or millions of records, the task becomes much more complex.

When you have to do something like this, aside from the fear of accidentally deleting something, the first thing you might think of is using an SQL DELETE statement.

DELETE statement

In other words, something as simple as writing this:

DELETE FROM MyBD.MyTable

The main drawback of using such an instruction is that it is very expensive to execute, from a computational point of view, since, clearly, what it does below is delete record by record, and generating a transaction for each of them.

And to top it off, it generates a lock for every delete statement (for every DELETE), which is more resource intensive.

With DELETE, if you have a few hundred or a few thousand rows, it will be very fast.

But if you have millions, the process can be very slow, affect the performance of the database server and will generate a huge transaction log.

However, there is an advantage to using DELETE, and if you don’t want to delete the entire contents of the table, it allows you to decide exactly what to delete, through the use of the WHERE statement.

But, as the title of this article says, what is sought is to eliminate ALL the content of a table, therefore, this solution is inadequate.

Another option, optimal for emptying a table of all its data is TRUNCATE the table.

TRUNCATE statement

Almost all data managers have a special instruction to do this:

TRUNCATE TABLE.

What this instruction does is exactly that: empty the table indicated of data. For example:

TRUNCATE TABLE MyBD.MyTable

Although it does the same thing as the DELETE statement, it has big differences with this one, which you will see below:

  1. Mode of operation: since it is not possible to restrict what is deleted (everything is always deleted), TRUNCATE does not scan the table record by record, nor does it block them or save each deletion in the transaction log.
  2. In fact, TRUNCATE deletes everything there is, locking the entire table and saving a single transaction to the log, thus reducing log usage to a bare minimum.
  3. It also locks the schema of the table, that is, the table structure cannot be modified while it is running, although, basically, the objective is to delete the records, and not to modify the table structure, both actions should not be planned at the same time, by way of advice.
  4. TRUNCATE is a DDL (Data Definition Language) statement and not a query.
  5. Therefore it does not return the number of records deleted, which DELETE does.
  6. Leave the autonumber fields with the initial value (normally 1), not being so in the case of DELETE.
  7. It does not execute triggers associated with data deletion, if any, DELETE does.
  8. It does not leave any pages of data hanging, which with DELETE can happen, leaving perhaps many blank pages taking up space.
  9. It doesn’t work with indexed views, while DELETE does.
  10. It cannot be used within a transaction.
  11. Regarding foreign keys, logically, you cannot delete the records of a table that have a foreign key with another and that have referential integrity. In that case, you would have to delete the dependent records first.

Example of using the TRUNCATE statement

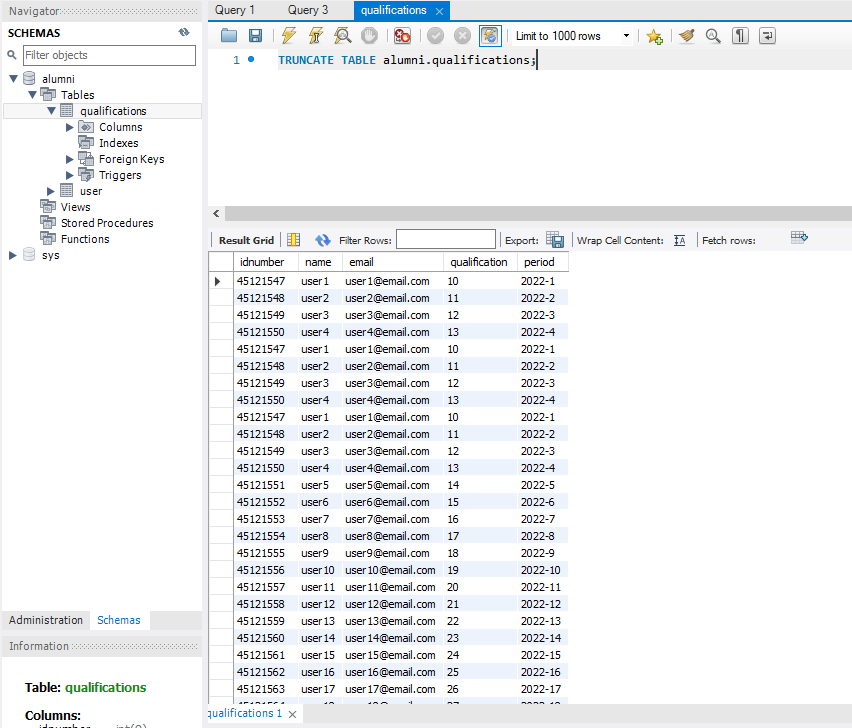
Here you will see a simple example of the instruction, executed in MySQL Workbench, however, Workbench already has this instruction predefined.

The table to be used is ‘qualifications’ from the ‘alumni’ database, which has 10 thousand records.

The execution was immediate, according to the log records, which indicated 0.250 seconds.

It is recommended to make a backup, previously, before making modifications to the database, in case it is a production one.Here you will find the official information of TRUNCATE for MySQL

TRUNCATE Table

Delete duplicate rows ​​in SQL

Sometimes we have one, two or more pieces of data that are repeated in
our tables. Even sometimes they are not only repeated 2 times, but 3 or
more. So today we will see how to remove these duplicates.

Solution

Basically we have to add some indexes to the table. Since, if we
remember, indexes are indexes because they are not repeated (and because
they help make searches faster).

Then, if we add indexes in the fields that we do not want to be repeated,
they will be eliminated in such a way that, of all the repeated ones, only
one will remain.

The query is:

ALTER IGNORE TABLE your_table ADD UNIQUE INDEX(column_1, column_2);

Where your_table is the name of the table with repeated data. In this
case it is supposed to be only 2 columns, but we can add many columns.

We use IGNORE so that it does not give us any error, since it will try to
warn us that there is repeated data and that it will be eliminated. But
since we already know that there are duplicates, we ignore the error.

After doing so, we can remove the index using:

ALTER TABLE your_table DROP INDEX column_1;

Here it is important to mention that the name of the index is formed by
the name of the first column. So if the first column was ‘name’ then the
index will be ‘name’ no matter how many columns you have indexed.

Practical example

In a table called ‘qualifications’ created with the following statement:

CREATE TABLE `qualifications` (
`idnumber` INT(9) NULL DEFAULT NULL,
`name` VARCHAR(100) NULL DEFAULT NULL,
`email` VARCHAR(100) NULL DEFAULT NULL,
`qualification` INT(2) NULL DEFAULT NULL,
`period` VARCHAR(50) NULL DEFAULT NULL
);

And we fill it with the data:

ID, Name, Email1, Note, Period
45121547,user1,[email protected],10,2022-1
45121548,user2,[email protected],11,2022-2
45121549,user3,[email protected],12,2022-3
45121550,user4,[email protected],13,2022-4
45121547,user1,[email protected],10,2022-1
45121548,user2,[email protected],11,2022-2
45121549,user3,[email protected],12,2022-3
45121550,user4,[email protected],13,2022-4
45121547,user1,[email protected],10,2022-1
45121548,user2,[email protected],11,2022-2
45121549,user3,[email protected],12,2022-3
45121550,user4,[email protected],13,2022-4

Which you must save in a CSV extension file and then load it to the table,
using the following code:

LOAD DATA LOW_PRIORITY LOCAL INFILE ‘~\\your_file.csv’ INTO TABLE
`alumni`.`qualifications` CHARACTER SET utf8 FIELDS TERMINATED BY ‘,’
OPTIONALLY ENCLOSED BY ‘,’ ESCAPED BY ‘,’ IGNORE 1 LINES (`idnumber`,
`name`, `email`, `qualification`, `period`);

It can be seen that all the records are repeated.

Eliminating duplicates

Now you must execute the command:

ALTER IGNORE TABLE qualifications ADD UNIQUE INDEX(name);

I will display the data again:

SELECT * FROM qualifications;

Being that way:

qualifications

idnumber name email qualification period
45121547 user1 [email protected] 10 2022-1
45121548 user2 [email protected] 11 2022-2
45121549 user3 [email protected] 12 2022-3
45121550 user4 [email protected] 13 2022-4

Delete Index

Finally, if we don’t want the indexes to be there, we can use:

ALTER TABLE qualifications DROP INDEX name;

It is necessary to notice that the name of the index is taken from the
first column that we specify when indexing.

Since in this case it was ‘name’, then that was the name of the index.

Import data from a CSV file into a pre-existing MySQL table

Sometimes we may need to import data from a comma-separated file into a
MySQL database table.

The first step we must do is create the table with the necessary fields:

CREATE TABLE `qualifications` (
`idnumber` INT(9) NULL,
`name` VARCHAR(100),
`email` VARCHAR(100),
`qualification` INT(2),
`period` VARCHAR(50);

Once you have created the table, then proceed to load the corresponding
data in each field, for this we will use the following instruction

LOAD DATA LOW_PRIORITY LOCAL INFILE ‘~\\your_file.csv’ INTO TABLE
`alumni`.`qualifications` CHARACTER SET utf8 FIELDS TERMINATED BY ‘,’
OPTIONALLY ENCLOSED BY ‘,’ ESCAPED BY ‘,’ IGNORE 1 LINES (`idnumber`,
`name`, `email`, `qualification`, `period`);

The result of this load is a table like the following:

qualifications

idnumber name email qualification period
1515151 Name 1 [email protected] 12 2022-1
1515152 Name 2 [email protected] 13 2022-1
1515153 Name 3 [email protected] 14 2022-1
1515154 Name 4 [email protected] 15 2022-1
1515155 Name 5 [email protected] 16 2022-1

Possible errors when uploading a CSV file

Field Separators and Delimiters

When loading a CSV data file it is important to consider the field
separators, the field completion and the escape of each line.

In our example, the comma was used as a field delimiter and escape.

The encoding of the file

The encoding of both the file and the Database must also be considered
(in this case, it was done with UTF8).

If the encodings do not match, there may be errors.

The location of the CSV file

Depending on the operating system, the location of the CSV file is of
importance, as the file location string could be very long, and thus be
incompatible with MySQL.

The data type

The data type of the fields declared in the Database must match the data
types in the CSV file, otherwise errors may occur when loading the data.

SQL Pivot Rows to Columns

This article will address the topic of MariaDB Server’s relational
instructions pivot rows to columns, which in an SQL query allow you to
exchange the results of rows by columns (cross-references).

Although in this post we focus on MariaDB Server, these operators are
available in other Database managers.

Adding values in the rows, towards a column

Using the SUM instruction we can return the sum of some numerical values
depending on categories stored in another field, without modifying the
table.

We will take as an example the ‘iduser’ table of the ‘alumni’ DB, whose
original records are the following:

iduser

idnumber name color valstat
7 Randy Brown 150
2 Paul Brown 120
12 Mark Yellow 210
12 Mark Yellow 310
2 Paul Yellow 310
2 Paul Brown 450
7 Randy Brown 150
7 Randy Yellow 240
2 Paul Yellow 80
7 Randy Green 150
2 Paul Gray 120
12 Mark Yellow 210
12 Mark Brown 310
2 Paul Gray 310
2 Paul Brown 450
7 Randy Brown 150
7 Randy Yellow 240
2 Paul Yellow 80

And we will pivot the table ‘iduser‘ using the ‘name‘ and ‘color
fields for the left columns, and the summing the ‘valstat‘ fields for
each cell in the new table, gives the following desired result:

iduser

name color sum(valstat)
Mark Brown 310
Mark Yellow 730
Paul Brown 1020
Paul Gray 430
Paul Yellow 470
Randy Brown 450
Randy Green 150
Randy Yellow 480


Create a table with the data returned by a procedure statement over
another table

The ‘account’ table, which does not exist, must have the following
structure:

  -color: chosen color
  -count: times a color appears

The ‘iduser’ table contains several records.

To save in ‘count’ the times that the same color appears, we can do it in
3 steps:

1st step: create the ‘account’ table:

create table account(
color varchar(20),
         count int(11)
        );

2nd step: perform the query in the ‘iduser’ table to obtain the
number of times a color appears, grouping by ‘color’ and calculating the
number with ‘count(*)’:

SELECT color, COUNT(*) from iduser group by color;

getting an output like the following:

color COUNT(*)
Brown 7
Yellow 7
Gray 4

3rd step: insert the necessary records in the ‘account’ table,
one by one:

insert into color, count values(‘Brown’,7);
insert into color, count values(‘Gray’,4);
insert into color, count values(‘Yellow’,7);

But there is another way simplifying the steps. We can create the ‘account’
table with the necessary fields by querying the ‘iduser’ table and at the
same time insert the information:

create table account select color as color, count(*) as count 
from id user group by color;

In this way we can feed a table, with the data grouped from another
pre-existing table.

Obtaining the same previous result

account

color COUNT
Brown 7
Gray 4
Yellow 7


Insert Multiple Rows in SQL

In this tutorial we will see how to insert several rows of data in a
single query in MySQL server.

For this tutorial we will use MySQL Server with MySQL Workbench.

Sometimes, the situation can arise in which it is necessary that in a
single INSERT “n” rows must be inserted in SQL Server.

To add multiple rows to a table at once, use the following form of the
INSERT statement:

INSERT INTO table_name (column_list)

VALUES    (value_list_1),   
(value_list_2),
    …   
(value_list_n);

In this syntax, instead of using a single list of values, it uses
multiple comma-separated lists of values ​​for the insert.

The number of rows that can be inserted at one time is limited with this
form of the INSERT statement.

You should probably use or consider using multiple INSERT statements,
BULK INSERT statements, or a derived table, to insert more rows.

Note that this multi-row INSERT syntax is only supported by SQL Server
2008 or later.

To insert multiple rows returned from a SELECT statement, use the INSERT
INTO SELECT statement.

SQL Server INSERT multiple rows – examples

We will use the ‘user’ table from the ‘alumni’ database and the field
will be ‘iduser’.

Multi-Row Insert Example

The following statement inserts multiple rows into the ‘user’ table:

INSERT INTO `alumni`.`user`
(`iduser`)
VALUES
(5),
(6),
(10),
(8);

Don’t forget to close the last record with a semicolon.

Check Result

To check the result, you can use the SELECT statement:

                  
SELECT userid
    FROM `alumni`.`user`;

Obtaining as a result the previously inserted values:

5
6
8
10

INSERT INTO with multiple fields

If it is multiple columns (fields), then the INSERT statement syntax is
as follows:

INSERT INTO table_name (column1, column2, column3) VALUES (value1,
value2, value3);

Example of simple insertion of values ​​in a table:

INSERT INTO `alumni`.`iduser`
(`idnumber`, `name`, `color`, `valstat`)
VALUES
(7, ‘Randy’, ‘Green’, 150),
(2, ‘Paul’, ‘Gray’, 120),
(12, ‘Mark’, ‘Yellow’, 210),
(12, ‘Mark’, ‘Brown’, 310),
(2, ‘Paul’, ‘Gray’, 310),
(2, ‘Paul’, ‘Brown’, 450),
(7, ‘Randy’, ‘Brown’, 150),
(7, ‘Randy’, ‘Yellow’, 240),

(2, ‘Paul’, ‘Yellow’, 80);


And the result, when you run the query:

SELECT *
FROM `alumni`.`user`;

It is the following:

iduser

idnumber name color valstat
7 Randy Brown 150
2 Paul Brown 120
12 Mark Yellow 210
12 Mark Yellow 310
2 Paul Yellow 310
2 Paul Brown 450
7 Randy Brown 150
7 Randy Yellow 240
2 Paul Yellow 80

Most Common Errors with the INSERT INTO Statement (Using Quotes)

The error known as: “The INSERT INTO statement contains the following
unknown field name: ‘|’ Please make sure you have spelled the name correctly
and try the operation again”, it is due to an error in spelling the field
name, or possibly you are typing the wrong character (`).

Another common mistake that occurs when writing an MySQL project is using
double quotes instead of single quotes. Single quotes are used to delimit
strings. For example, double quotes are used here instead of single
quotes, which causes an error.

Finding SQL syntax errors

Finding SQL syntax errors can be tricky, but there are some tips on how
to make it a little easier. Using the Error List function helps a lot.

It allows the user to review errors while still writing the project and
avoid searching through thousands of lines of code.